Chrome delete in San Diego covers factory bright trim with vinyl, usually creating a black or dark finish without painting those pieces. Partial wraps and chrome delete typically cost $250 to $1,500, depending on the vehicle and scope. A close inspection matters because badges, grille slats, roof rails, and tight corners don’t wrap the same way.
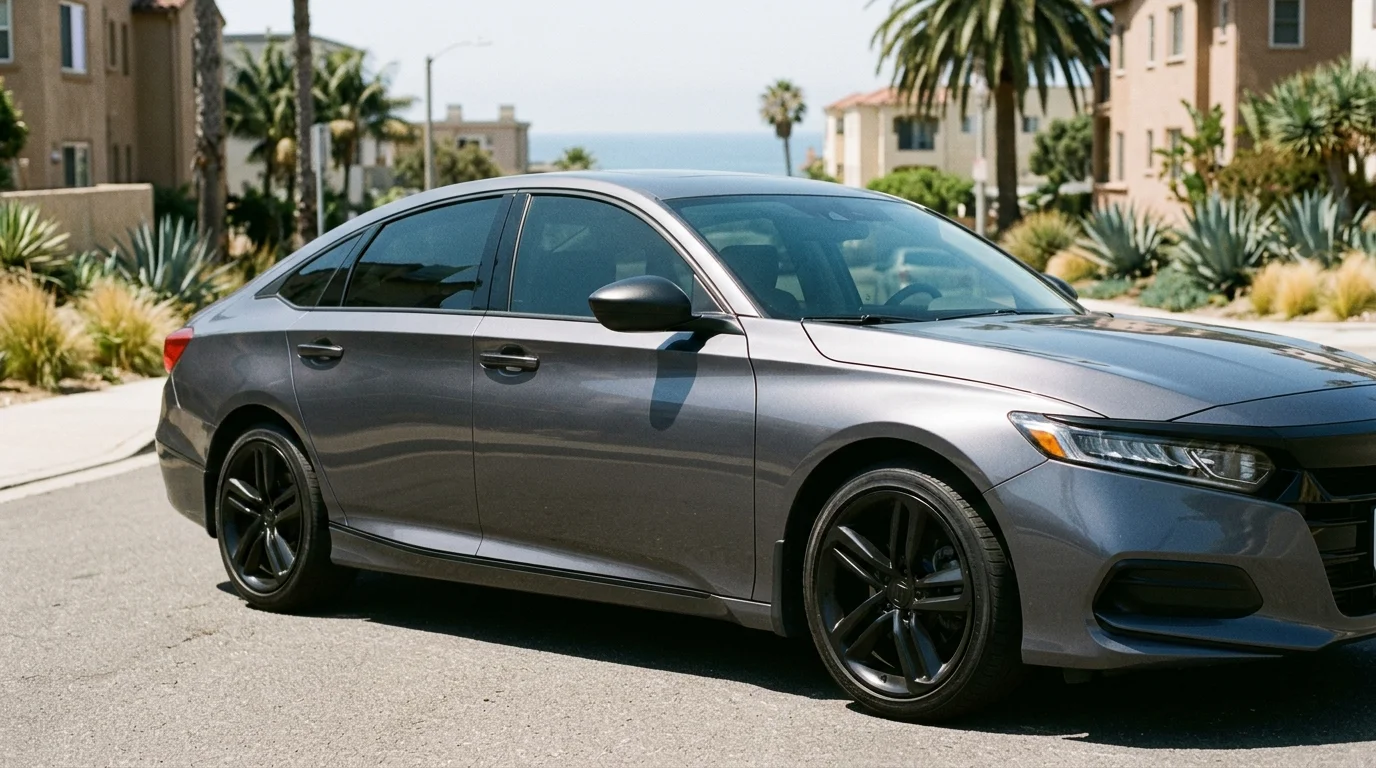
What chrome delete covers on a typical car
Most chrome delete projects start around the side windows. The installer wraps the bright upper and lower window surrounds with dark vinyl. That change often makes the roofline look lower and the glass area more unified.
The scope can extend well beyond the windows. Common candidates include grille accents, lower fascia strips, roof rails, door handles, mirror accents, trunk trim, and badges. Your vehicle may have all, some, or none of these pieces. Factory styling varies widely between models and trim levels.
Ask for a written list of every piece in the quote. “Full chrome delete” can mean different things between installers. One quote might cover only the window surrounds. Another could include the grille, handles, rails, and rear trim. A piece-by-piece scope makes those quotes easier to compare.
Look at the car in several settings before choosing a finish. Gloss black can echo tinted glass and piano-black factory trim. Satin or matte vinyl creates a softer contrast. Lighting also matters. A finish viewed inside a Kearny Mesa garage may look different outdoors in Chula Vista or La Jolla.
Chrome delete is a trim treatment, not impact protection. If the goal is guarding painted panels against road debris, review paint protection film options separately. A commercial logo or large branded graphic is also a different project. Our guide to commercial fleet wraps in San Diego explains that broader application.
Take clear photos from every side before requesting quotes. Include close views of the grille, window corners, roof rails, and rear trim. Photos help the pro spot pieces needing an in-person inspection.
Vinyl over brightwork vs painting the trim
Chrome delete places vinyl over factory brightwork. It changes the visible finish while leaving the covered material underneath. Wraps are removable, which gives owners a path back toward the original appearance later.
Painting follows a different process. The trim’s existing surface must be prepared for a new coating. Returning painted trim to its factory appearance may then require more refinishing or replacement. If reversibility matters, ask both the wrap installer and paint shop to explain their process in writing.
Vinyl also makes it easier to coordinate trim with a larger wrap plan. A dark window surround can be completed alone, then paired with a roof or accent wrap. Drivers considering a broader transformation can compare finishes through the vinyl wrap and color change service.
Condition matters with either route. Vinyl needs a stable, clean surface. Pitting, peeling material, failing clear coat, old adhesive, or earlier repairs can affect adhesion and removal. Wrap adhesion can lift failing clear coat, so the installer should inspect questionable areas before covering them.
Ask where seams and relief cuts will sit. Long, straight trim may allow cleaner coverage than deeply recessed or sharply curved pieces. A good quote should identify any part that can’t be wrapped neatly. It should also explain whether a difficult piece will be excluded, wrapped in sections, or handled another way.
Color matching deserves attention too. Several dark finishes can look similar on a small sample but different across the whole car. Compare the sample beside the glass, paint, wheels, and existing black plastic. View it in shade and direct daylight.
The better choice depends on the surface, desired finish, and future plans. Chrome delete favors owners who want a removable change. Painting may suit a different goal, but its preparation and return path should be clear before work begins.
Which trim pieces are easy and which are fussy
Long window strips often present the clearest starting point. Their shape is visible, and the desired change is easy to define. Even then, the corners, rubber seals, and joints need careful attention.
Grilles can be more involved. A wide outer border differs from many narrow slats or recessed accents. Badges and lettering also introduce small gaps and tight edges. These details may affect whether the installer wraps each surface, works around it, or excludes it from the scope.
Roof rails vary by vehicle. Some have broad exposed faces. Others meet rubber channels, end caps, or textured surfaces. Don’t assume “roof rails included” describes every visible side. Ask the installer to mark the covered faces in photos.
Door handles and mirror accents bring frequent hand contact and curved edges. Those pieces should be discussed separately from straight body trim. The installer can explain the proposed seams, edge placement, and care instructions for that vehicle.
Older brightwork deserves closer inspection. Look for pitting, lifting edges, cracks, loose sections, and residue from previous treatments. A dark film can change the color, but it doesn’t rebuild a damaged surface underneath. Texture or damage may remain visible through the vinyl.
San Diego driving patterns also shape the decision. A commuter traveling Interstate 805 between the South Bay and central San Diego may prioritize an understated factory-style look. A weekend car stored in North County may be judged more closely for tiny seams and badge details. The installation standard should fit how you use and inspect the car.
Before approving the job, request a walkaround with the pro. Point to every bright piece and label it as included, excluded, or undecided. Confirm the finish for each included item. That short review prevents a window-only quote from being mistaken for a bumper-to-roof treatment.
What it runs and how long it lasts
Chrome delete and other partial wrap work typically cost $250 to $1,500. The range reflects differences in vehicle size, trim count, surface condition, and application difficulty. Your installer confirms the written price.
A simple window-surround treatment sits at a different scope than a project covering grilles, handles, rails, badges, and rear trim. Two vehicles of similar size can still require different work. One may have broad, accessible strips. Another may have many narrow pieces, deep recesses, and tight corners.
Compare quotes by scope, not only by total price. Each quote should name the included pieces, vinyl finish, preparation work, and excluded areas. Ask whether removal of old film or adhesive changes the price. Don’t assume a verbal reference to “all chrome” covers every factory accent.
No universal service life could be confirmed from the approved sources for this site. Film, surface condition, parking, care, and exposure can all affect how the finished trim ages. A car parked outside in inland East County faces a different routine than one kept in covered coastal parking, but that difference doesn’t support a promised lifespan.
Ask the installer to identify the product tier and confirm the film warranty in writing. The document should come from the installer or product source, not Paint Shield SD. Also ask what the warranty excludes and whether labor, edges, lifting, fading, and removal are addressed.
Care instructions should be specific. Get written guidance for washing, pressure around edges, chemicals, and automatic car washes. Follow the installer’s directions because the correct method can depend on the film and edge placement.
Scheduling also depends on the actual scope. Ask the pro how long your vehicle must remain available and when it can be washed afterward. Treat that answer as project-specific, not a general promise for every chrome delete.
Taking it off later
Removability is one of vinyl’s main differences from painted trim. An installer can remove the film when you want the factory brightwork visible again, change finishes, or prepare the vehicle for another styling plan.
Removal still begins with an inspection. The condition under the vinyl matters. Stable factory surfaces and failing repaired surfaces don’t present the same risk. If film crosses painted areas with weak clear coat, removal can lift that failing material. Tell the pro about repainting, touch-ups, or earlier trim repairs before work begins.
Don’t assume every piece will return to showroom condition. The underlying trim continues to have its own age and condition. Existing scratches, pitting, discoloration, or damage may remain after the vinyl comes off. Adhesive cleanup may also be part of the removal process.
Document the vehicle before installation. Take close photos of each covered piece, especially any existing flaw. Keep the written scope, film information, care instructions, and warranty documents together. Those records create a useful baseline if an edge lifts or you later request removal.
Ask who handles removal and what that service includes. The original installer may be able to inspect the application history, but availability shouldn’t be assumed. Get the removal terms and price separately when you’re ready to proceed.
Aftermarket products can also raise vehicle-warranty questions. The FTC explains that a manufacturer generally can’t void a warranty merely because an aftermarket product was used, absent a showing that it caused the failure. That doesn’t decide a specific dispute. Review your warranty documents and get case-specific answers in writing.
A planned removal is also a good time to reconsider the next step. You might restore the bright trim, choose another vinyl finish, or coordinate the trim with a larger color-change wrap. Let the surface inspection guide that decision.
When to call us
Bring in a professional detailing, ceramic coating, or paint protection film pro when the trim has tight curves, damaged surfaces, old adhesive, or a scope that’s difficult to compare. Call us at (760) 400-6557 and we’ll connect you with a vetted, insured local pro.